


Extension for satellite cable: A DIY Guide to Extending Your Setup
It happens to the best of us. You rearrange the furniture or decide to move the telly to a new spot, only to discover the satellite cable won’t quite reach. While simply adding an extension for satellite cable seems like an easy fix, grabbing the wrong bits and pieces can spell disaster for your picture quality. A shoddy cable or a poor connection can easily turn your crystal-clear Sky or Freesat picture into a pixelated mess.
Choosing The Right Satellite Extension Cable
The temptation to just buy the cheapest extension kit on the shelf is real, but it’s a decision that often leads to frustration. High-frequency satellite signals are finicky; they demand good quality cable and secure connectors to travel from your dish to your TV without degrading.
With over 15 million UK households relying on satellite or cable TV, the need for reliable parts is massive. In fact, the market for components like cable connectors is expected to hit US$3.46 billion in 2024 and is forecast to grow to US$5.85 billion by 2032. It just goes to show how many of us depend on these small but crucial parts to keep our services running smoothly.
Selecting The Best Coaxial Cable
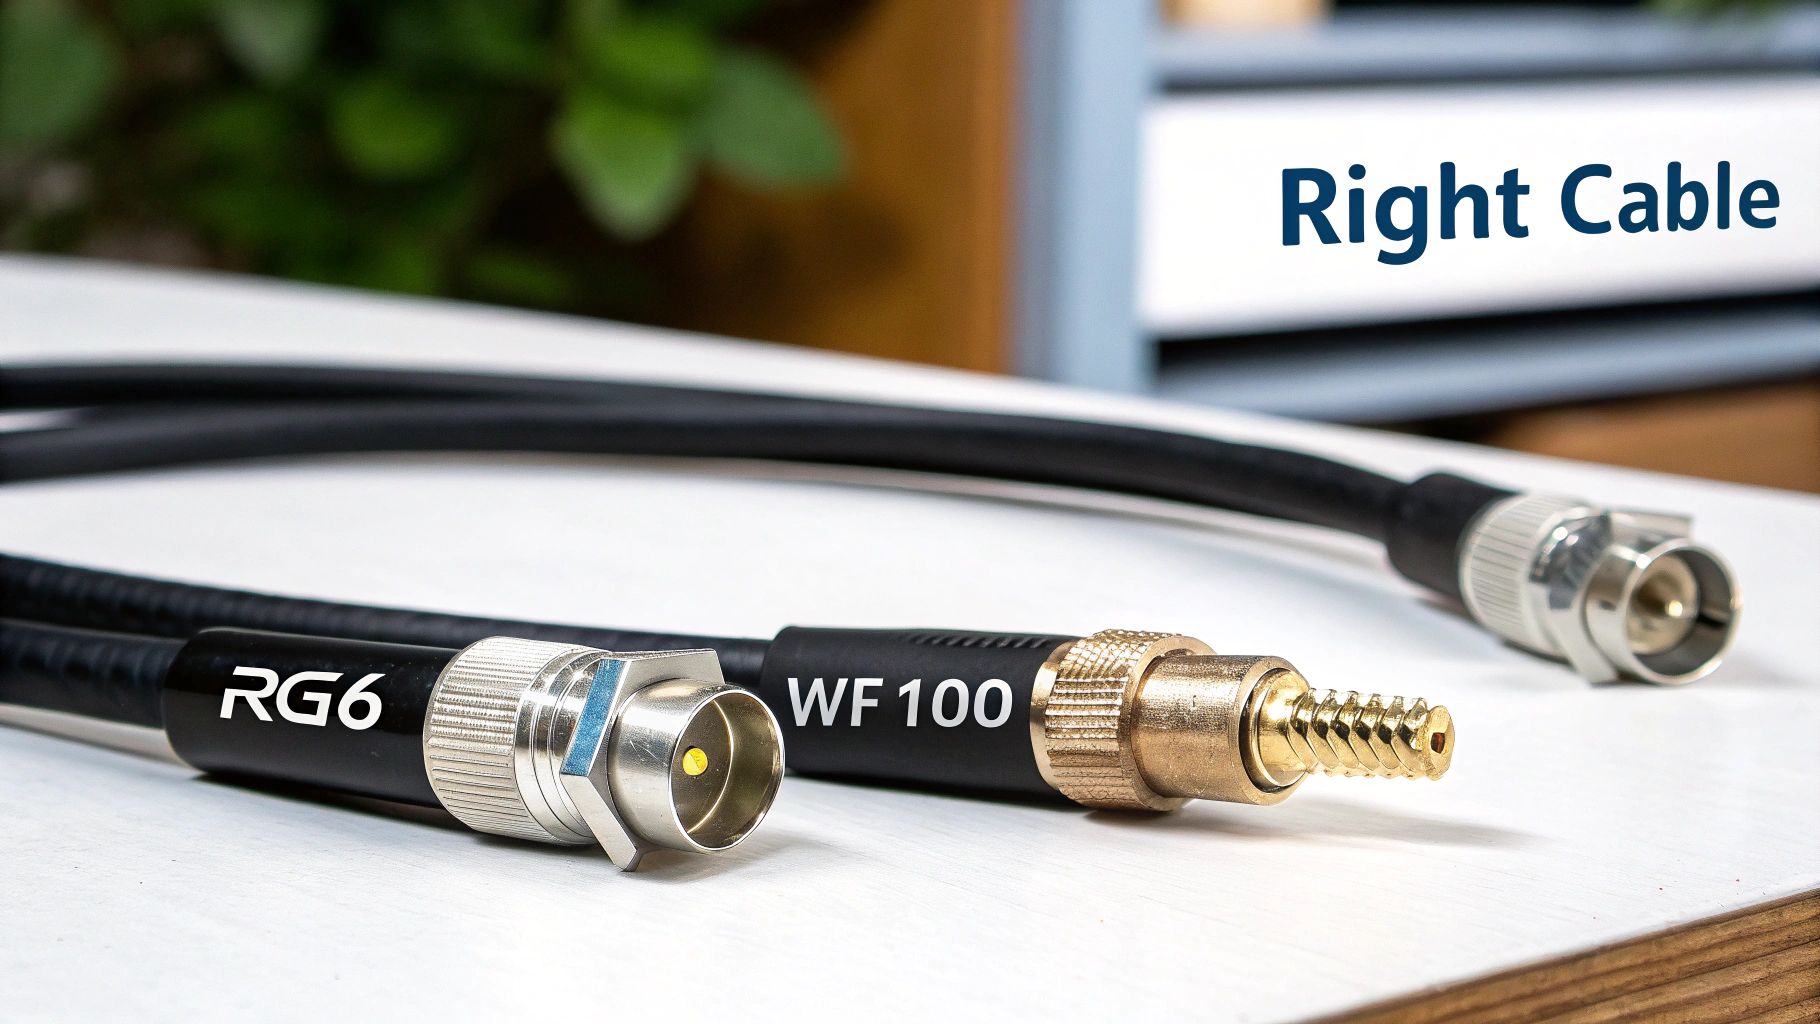
When you're looking at cables for UK satellite systems like Sky Q or Freesat, you’ll typically come across two main contenders: RG6 and WF100. They might look similar, but there’s a genuine difference in performance.
Here’s a quick look at the features and typical uses for coaxial cables in UK satellite installations.
Comparing Common UK Coaxial Cables
| Cable Type | Best For | Shielding Level | Typical UK Use Case |
|---|---|---|---|
| RG6 | Shorter, indoor cable runs | Good | A cost-effective choice for extending a cable across a living room. |
| WF100 | Longer runs, outdoor use, and professional installations | Excellent (Double Shielded) | The go-to for running a cable from a dish or for extensions over 20 metres. |
In short, while both will get the job done in some capacity, WF100 is what the professionals use for a reason. It has a higher-grade copper core and superior double shielding, which does a much better job of fighting off signal loss (attenuation) and interference from other electrical noise in your home.
Insider Tip: If your extension cable needs to run near mains power leads, or if the total cable length from the dish to the box will be over 20 metres, don't hesitate—go for WF100. The small extra cost is well worth it to avoid signal headaches later on.
Connectors And Couplers You Will Need
Picking the right cable is only half the battle; you also need the correct hardware to join everything together. The industry standard for satellite TV in the UK is the F-type connector. It’s a threaded plug that screws firmly onto your equipment, creating a really solid, reliable connection.
To join your new extension to your existing cable, you’ll need an F-type barrel connector, sometimes called a coupler. It's a simple little device with a female connection on both ends.
If any part of this connection will be outside, make sure you get a weatherproof barrel connector. These have built-in rubber seals that are absolutely vital for stopping rain and damp from getting into the join and causing corrosion—a very common culprit behind signal failure. If you're looking for these kinds of parts, you can often find a good selection of electronics and accessories at specialist retailers.
How to Prevent Satellite Signal Loss
Extending a satellite cable isn't just about making it longer; the real trick is keeping the signal strong and clear along the way. Every single metre of cable you add introduces something called attenuation—basically, the signal gets weaker as it travels from your dish to your receiver. It’s a bit like shouting to a friend across a long field; the further away they are, the fainter your voice becomes.
This is exactly why the quality of your extension cable is so critical. Let's say you're running a 30-metre cable out to a new garden office. If you opt for a cheap, poorly shielded cable, you might be setting yourself up for frustration. That could be the difference between watching a perfect 4K movie and being stuck with a pixelated, buffering mess. The signal just loses too much of its punch to deliver the data your satellite box needs.
Understanding Signal Attenuation
We measure this signal weakening in decibels (dB). Different cables lose signal at different rates, which is why you'll see various types on the market. A good quality cable like a WF100 is built with better insulation and a thicker copper core specifically to minimise this loss, helping the signal stay robust over a greater distance.
It's not just the cable itself, either. Every connection you add—like the barrel connector you use to join the old and new cables—will introduce a tiny bit of signal loss. One properly fitted connector is no big deal, but if you start daisy-chaining multiple joins, the combined effect can seriously degrade your picture quality.
A strong, clean signal is the backbone of modern satellite services. The UK's satellite data market, which hit USD 634.1 million in 2024, depends entirely on this infrastructure for everything from TV to broadband. With demand always on the rise, making sure every part of your setup is up to scratch is more important than ever. Learn more about the UK's growing satellite data market.
When to Use a Signal Amplifier
So, at what point does this signal loss become a real problem? And what can you do about it? If your cable run is just too long for the signal to make it in one piece, a signal amplifier (sometimes called a booster) is your best friend.
There’s no single magic number, but from experience, you should definitely consider a booster in these situations:
- Long Cable Runs: If the total cable length from the dish to your box is pushing past 30-40 metres, an amplifier is almost certainly a good idea.
- Multiple Splitters: Splitting the signal to run multiple satellite boxes around the house? Each splitter slices up the signal strength. An amplifier is often needed to compensate for that loss.
- Weak Initial Signal: Sometimes, the signal from the dish is weak from the get-go, perhaps due to nearby trees or less-than-perfect dish alignment. An amplifier can give that initial signal the leg-up it needs.
An amplifier is a small device that you install directly in the coaxial line. It cleverly draws a tiny amount of power from your satellite receiver to boost the signal before it gets too weak. For the best results, you want to place the amplifier closer to the dish than the receiver—I usually aim for about a quarter of the way down the cable. This ensures you’re amplifying a relatively clean signal, not just making a weak, noisy one louder. For a truly professional and safe installation, proper grounding is also key, and using components like a copper ground bar is part of building a robust system.
Installing Your Satellite Cable Extension
Alright, you’ve got your high-quality cable and the right connectors. Now for the practical part. Getting this right is all about attention to detail. A methodical, careful approach here will pay dividends, ensuring you get a perfect picture the moment you power everything back on.
The secret to a smooth, frustration-free installation is having the correct tools on hand before you start. You don’t need a massive toolbox, just a few specific items designed for handling coaxial cable. Trust me, trying to bodge it with general-purpose pliers or a craft knife will only lead to a poor connection and a headache later on.
Your DIY Satellite Cable Extension Toolkit
To get a professional-quality finish that will last for years, it's worth gathering these bits and pieces first.
| Tool/Material | Its Purpose | Insider Tip |
|---|---|---|
| Coaxial Cable Stripper | This is the star of the show. It precisely cuts the outer sheath, shielding, and inner dielectric to the perfect lengths in one go. | Don't try to use a knife. A dedicated stripper is cheap and guarantees a perfect cut every time, which is crucial for a strong signal. |
| Coaxial Crimping Tool | If you're using crimp-on F-connectors (which I recommend), this tool is essential for a secure, permanent fit. | It applies even, consistent pressure that you just can't replicate with pliers. This prevents the connector from pulling off. |
| Sharp Cable Cutters | Provides a clean, square cut on the cable end. This is the foundation of a good connection. | Avoid using blunt side-cutters or pliers, as they can crush the cable, deforming the core and making it difficult to attach the connector properly. |
| Cable & Connectors | Your chosen WF100 or RG6 cable, two F-type connectors, and one F-type barrel coupler. | Always buy one extra connector. It’s a small price to pay for peace of mind in case you make a mistake on your first attempt. |
Having this kit ready means you can work efficiently without having to stop and search for a substitute tool that won't do the job as well.
This is exactly why a good installation matters. The signal from your dish naturally gets weaker the further it has to travel, a process called attenuation.

As you can see, the signal starts strong but degrades along the cable's length. Every poor connection or kink in the cable just makes this loss worse, which is why we're aiming for perfection at every stage.
Preparing and Connecting The Cables
Now we get to the most critical part of the entire process: preparing the cable ends. From my experience, a poorly prepared cable end is the number one cause of signal problems.
First, take your cutters and make a clean, straight cut on both your existing cable and the new extension piece. Pop the cable end into your coaxial stripper and give it a few rotations. It’s designed to neatly slice through the outer layers, exposing the central copper core while leaving the braided shield perfectly intact.
Next comes the delicate part. Carefully fold back the braided shielding so that it’s completely clear of the centre wire. Double-check that not a single tiny strand of the braid is touching the copper core. This is so important – even one stray strand can short the connection and kill your signal entirely.
With the shielding folded back, you can now slide the F-connector over the cable end. Push it on firmly until the inner white dielectric sits flush with the base of the connector inside. Grab your crimping tool and give it a firm squeeze to secure it in place.
Crucial Tip: After attaching an F-connector, give it a good, firm tug. If it wiggles or pulls off, it wasn't on properly. Cut it off and start again. A loose connector is a future failure waiting to happen, especially if it's in a spot where it might get accidentally knocked.
Joining and Testing Your Work
With new F-connectors securely attached to both your original cable and the extension, you're on the home straight. The final step is to join them using the barrel coupler.
Simply screw each cable end onto the coupler. You only need to make it finger-tight. There’s absolutely no need to get a spanner on it; over-tightening can easily damage the delicate threads or the pin inside, ruining the connection.
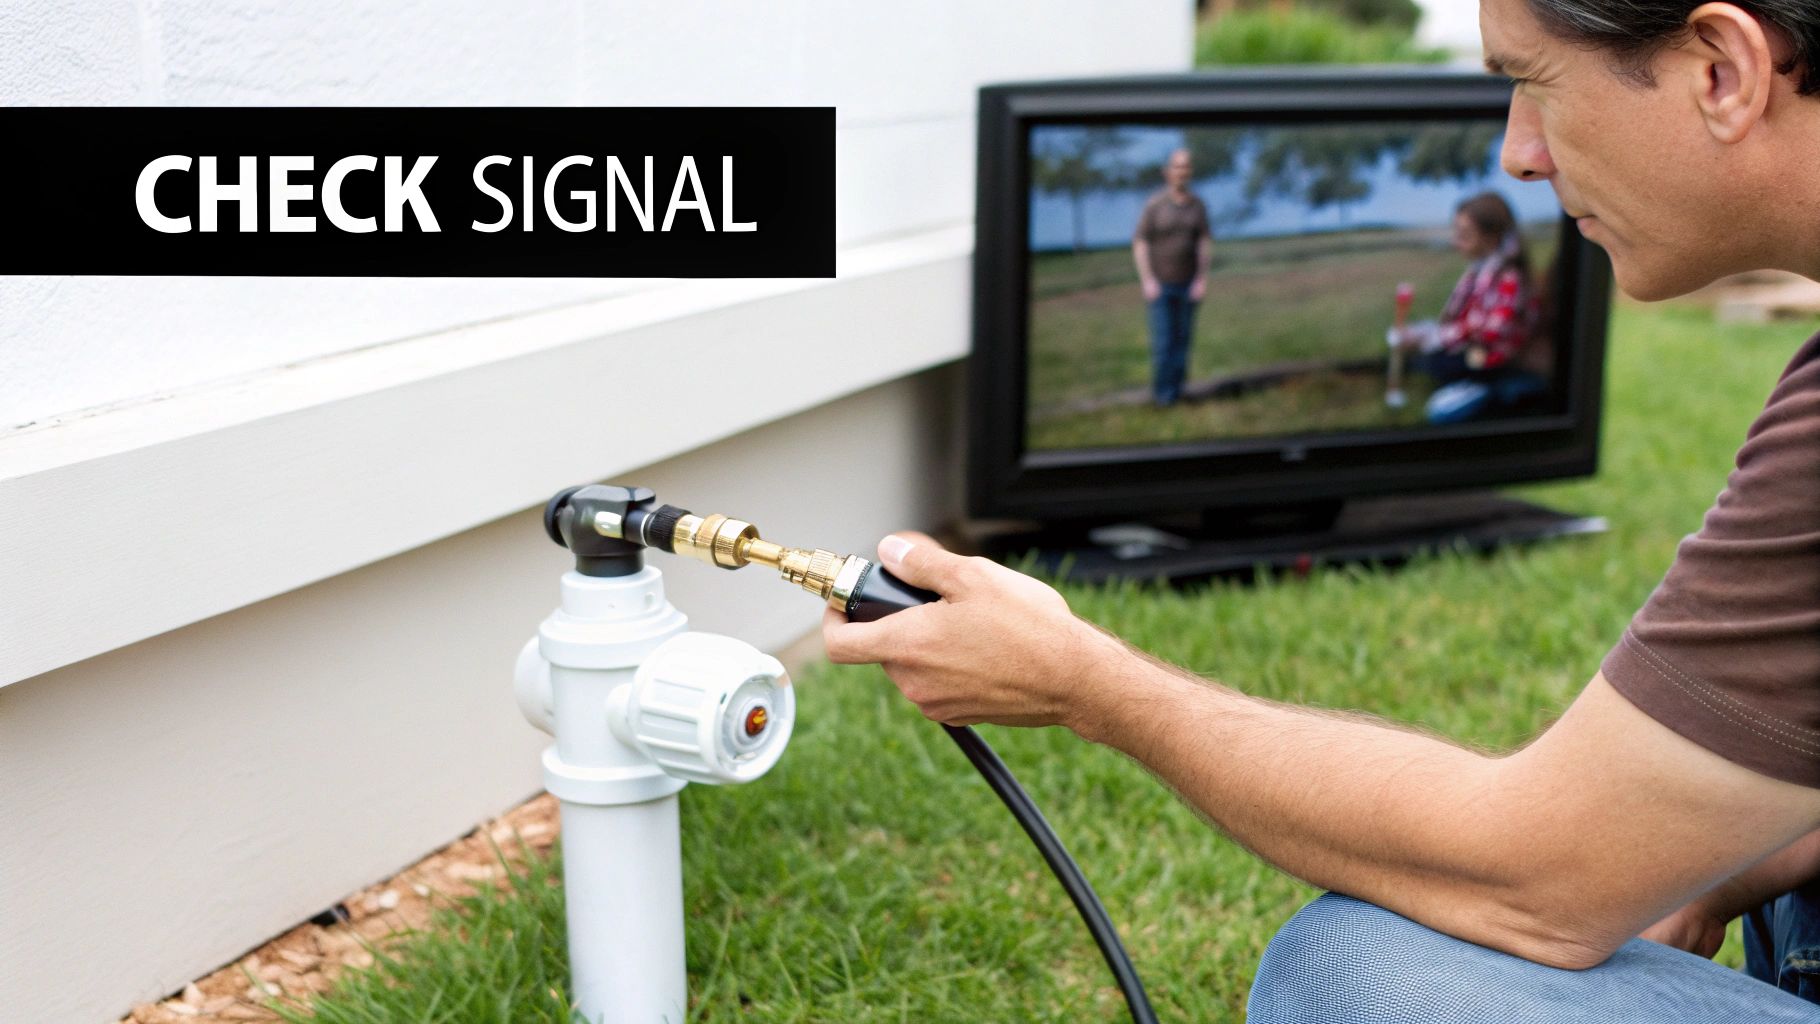
Now for the moment of truth. Connect your newly extended cable to your satellite receiver, and fire up the TV. Buried in your satellite box's settings menu, you'll find a signal strength and quality meter. Navigate to that screen to check your handiwork. If all has gone to plan, you should be seeing healthy, strong readings on both meters.
If you've had to work at height to access your cables, always prioritise your safety. Using the right equipment is non-negotiable, and you can learn more by checking out our guide on finding a safe and sturdy step ladder for DIY jobs.
Troubleshooting Common Signal Problems
You've done the work, fitted the extension, and you're ready to settle down for a good evening's telly. But instead of your favourite show, you're greeted with a blocky, stuttering picture or, even worse, the dreaded "No Signal" message. Don't throw the remote just yet. In my experience, these problems are almost always caused by something simple and straightforward to fix. A bit of methodical thinking is all you need.
When a problem pops up right after you've fitted an extension for satellite cable, nine times out of ten, the issue is at a connection point. The best approach is to trace the cable's path from your satellite box all the way back to the dish, double-checking every single join along the way.
The No Signal Diagnosis
A completely black screen is usually the easiest problem to track down. Before you start thinking about bigger issues, just run through this quick checklist. You’d be surprised how often the solution is right there in the first couple of steps.
- Check Your Connections: Start where the cable meets your satellite receiver. Is that F-connector screwed on properly? Now, find the barrel coupler where you joined the new cable. Make sure both ends are finger-tight. Don't be tempted to force them.
- Inspect Your Work: Have a really close look at the F-connectors you attached yourself. It’s incredibly easy for a single, tiny strand of the braided shielding to accidentally touch the central copper wire. This creates a short circuit and kills the signal stone dead.
- Cable Health Check: Scan the entire length of the cable, especially the new part, for any sharp bends, kinks, or obvious signs of damage. If the cable has been crushed or bent too sharply, its internal structure can be ruined, blocking the signal completely.
Real-World Tip: The Danger of Over-Tightening It feels sensible to grab a spanner and give those connectors one last twist for good measure, but this is a classic mistake. You can easily snap the delicate central pin inside the barrel coupler or damage the threads on the connector itself. This creates a poor electrical contact and you’re back to square one with no signal. Finger-tight is all you need.
Solving Picture Freezing and Blockiness
What if you have a picture, but it’s constantly freezing, breaking up into little squares (pixelating), or glitching? This points to a weak or poor-quality signal, not a total loss. This kind of problem can be more frustrating because it often comes and goes.
The root cause here is usually signal degradation. Your satellite box is getting some information, just not a complete, stable stream of data to build a clear picture. This is often down to a poorly made connection, a cheap, low-quality cable, or moisture getting into the system, especially if your join is outside.
A classic example I’ve seen countless times is what I call "The Rainy Day Glitch." The picture is perfect when it’s dry, but as soon as it starts to rain, it becomes unwatchable. This is a dead giveaway that your outdoor barrel connector isn't properly weatherproofed. Water has seeped into the connection, shorting it out and tanking your signal quality.
If you suspect this is the case, disconnect the join, make sure everything is completely dry, and then replace it with a proper weatherproof coupler that has rubber O-ring seals. For an extra layer of defence, I always recommend wrapping the finished join tightly with self-amalgamating waterproof tape. It's a fantastic belt-and-braces solution. You can also use simple tools like a voltage tester screwdriver to safely check for continuity and rule out basic electrical faults in your wiring.
Advice for UK Installations
If you're tackling a satellite extension yourself here in the UK, there are a few local quirks to be aware of. Getting it right isn't just about getting a picture on your screen; it's about doing a safe, professional-looking job that will last.
Choose Your Cable Wisely
One of the best decisions you can make is to use the right cable from the get-go. While standard RG6 cable will do the job in many cases, if you look at what the pros use for Sky installations, you'll almost always find they're using WF100 coaxial cable.
There’s a very good reason for this. It has superior double shielding and a solid copper core, which means better long-term performance and much more resilience against signal interference. In a built-up urban area with lots of competing signals, that can be the difference between a perfect picture and a glitchy one.
Route Your Cable Like a Pro
Thinking through your cable's path is a critical safety step. A golden rule I always follow is to keep your new satellite cable well away from any mains electrical wiring. If you run them side-by-side, you're just asking for electrical noise to bleed into your signal, which can cause anything from annoying picture breakup to total signal loss.
Of course, sometimes you can't avoid crossing a power line. When you absolutely have to, make sure you cross it at a sharp 90-degree angle. This simple trick minimises the potential for interference.
When you're running the cable outside, don’t just let it hang. Secure it neatly with properly spaced cable clips. It looks a thousand times better and, more importantly, stops the wind from whipping the cable about and causing damage over time.
This kind of attention to detail is more important than ever. The UK’s fixed connectivity market—the infrastructure that underpins services like Pay TV—is a huge industry. It's projected to grow from USD 36.57 billion in 2026 to USD 43.72 billion by 2031, and all of it relies on high-quality cabling and installation standards.
Check for Local Rules and Restrictions
Before you get your drill out, take a moment to consider if any local restrictions apply to your property. This is especially crucial if you live in certain types of buildings.
For example, if you're in a listed building or your home is inside a conservation area, you'll almost certainly be bound by strict rules on any external work. These regulations are there to protect the building's character, and something as simple as running a visible cable could require planning consent.
When in doubt, always have a quick chat with your local planning authority before you start. Having to remove an unauthorised installation on a listed building is a nightmare you can easily avoid.
The same logic applies if you rent or live in a flat. It’s vital to check your tenancy agreement or speak to your landlord or the property management company first. They often have specific rules about how and where cables can be run. Taking these local factors into account from the start ensures your project goes smoothly and stays on the right side of the rules. For any powered outdoor jobs, always make sure you have the right equipment; a proper outdoor extension lead for garden use is a must for safety and reliability.
Your Questions Answered
When you're looking to extend a satellite cable, a few common questions always seem to come up. Let's get them sorted so you can tackle your project with confidence.
Can I Use a Regular TV Aerial Cable for a Satellite Extension?
It’s a common thought, but the answer is a definite no. Satellite systems and regular terrestrial TV operate on completely different frequencies. Think of it like this: satellite signals are much higher frequency, and they need a high-grade coaxial cable like RG6 or, even better, WF100 to travel down.
These cables have much better shielding to protect that delicate signal from outside interference. Your standard TV aerial cable just doesn't have the muscle for the job. Using it will almost guarantee a weak, glitchy picture, or more likely, no picture at all.
How Long Can a Satellite Cable Be Before I Need a Booster?
This is where quality really counts. With a good WF100 or RG6 cable, you can easily run a line up to 30 metres without a hint of trouble.
However, once your total cable length—from the dish all the way to your set-top box—starts pushing past the 40-metre mark, signal loss can become a real problem. For these longer distances, popping a signal booster (or amplifier) in the line is a smart move to keep your picture rock-solid.
Expert Tip: If your total run is anywhere near 40 metres, it’s worth installing an amplifier from the start. It’s far easier to do it then than to have to troubleshoot a weak signal and add one later on.
Will Extending My Cable Reduce My Picture Quality?
As long as you do it right, extending your cable shouldn't impact your picture quality one bit. The final result all comes down to the quality of your gear and how carefully you put it all together.
To get it right, you need to nail three things:
- Use High-Grade Cable: Don't skimp here. Stick to WF100 or RG6 coaxial cable.
- Get Quality Connectors: Proper, well-made F-type connectors are essential for a solid link.
- Ensure a Perfect Installation: Every connection has to be clean, tight, and if it's going outside, completely waterproof. Moisture is the enemy of a good satellite signal.
What Tools Do I Need for a Satellite Cable Extension?
You could buy a pre-made cable, but for the tidiest and most reliable job, making your own custom-length cable is the way to go. To do this properly, you’ll need a couple of specific tools.
A good coaxial cable stripper is non-negotiable; it prepares the cable end perfectly without nicking the crucial inner layers. You'll also want a coaxial crimping tool to attach the F-connector securely, giving you a connection that will last for years. Investing in these two simple tools makes all the difference between a professional job and a frustrating one.
At Deal For Any Occasion, we stock a wide range of DIY tools and electronics to help you get the job done right. Find everything you need for your next project by visiting us at https://dealforanyoccasion.com.