


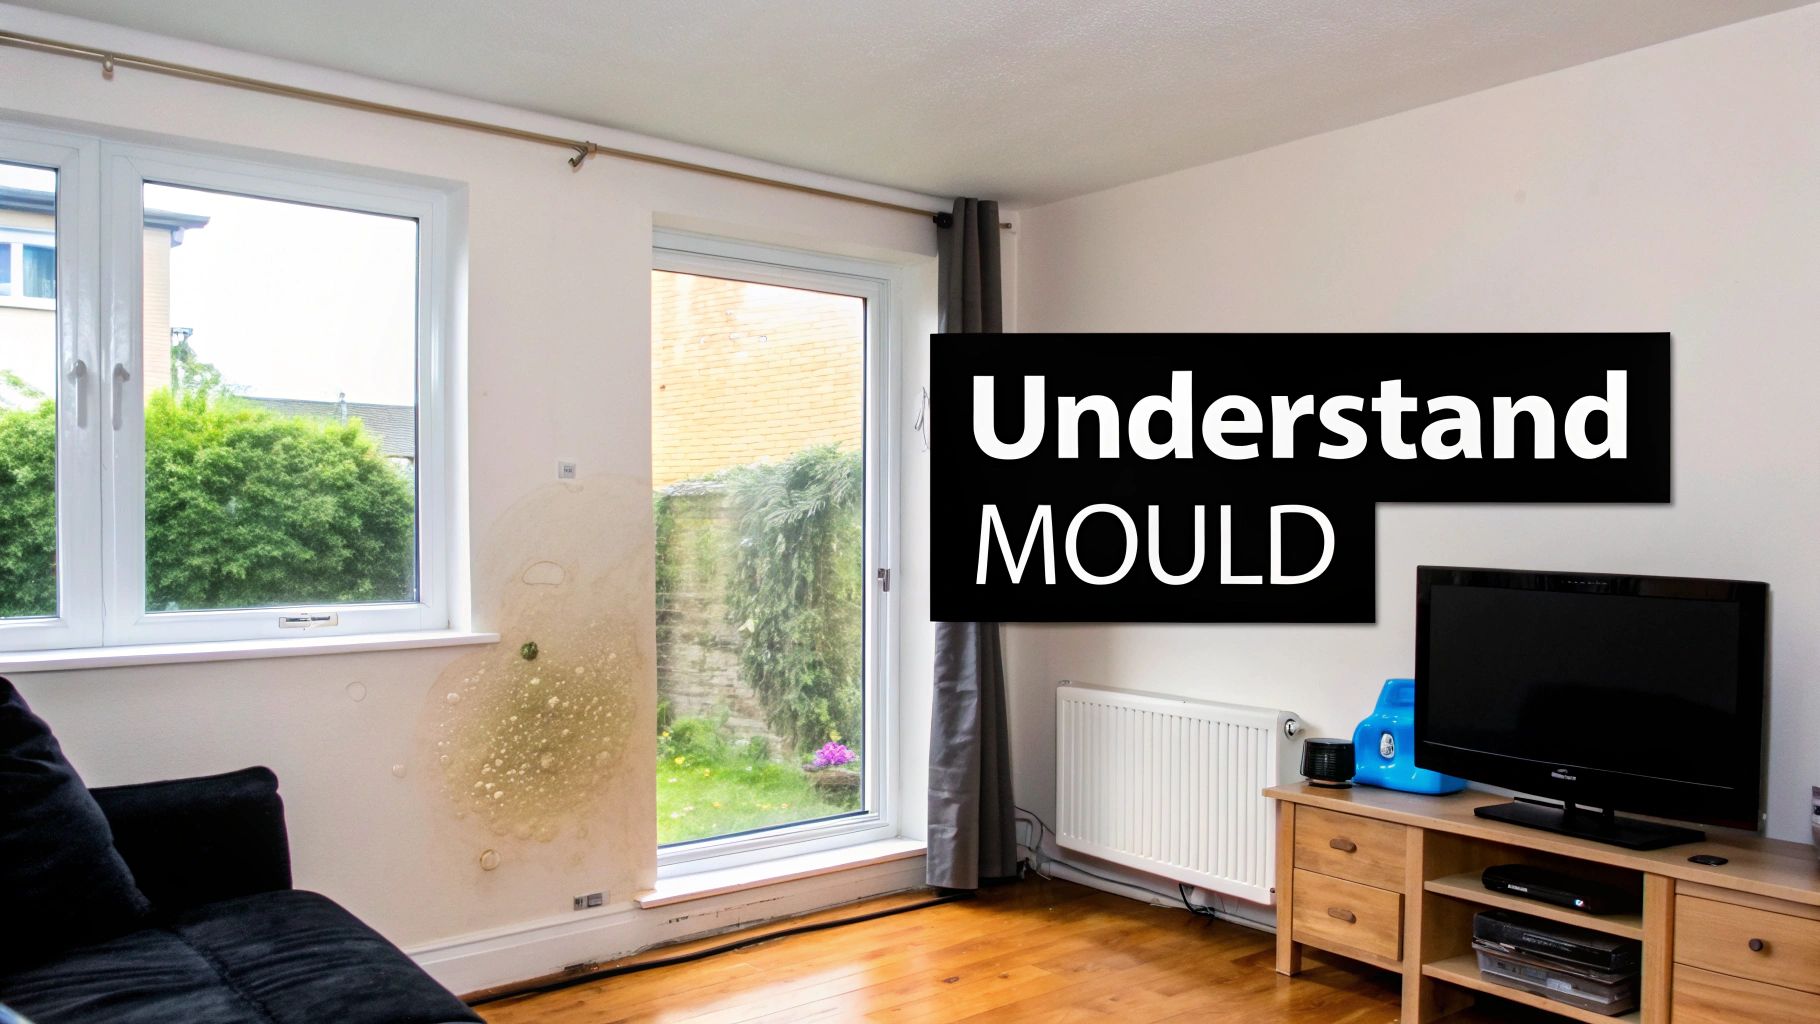
How to Get Rid of Mold: Quick DIY Guide for UK Homes
Dealing with mould isn't just a case of scrubbing what you can see. To really solve the problem for good, you need to find the source of the damp, get some air flowing, and then clean up what’s left behind. Anything else is just a temporary fix.
Why Mould Is Such a Problem in UK Homes
Before we get into how to banish mould, it’s worth understanding why it loves UK homes so much. Our famously damp, cool climate creates the perfect conditions for it to flourish, and wiping a patch off a wall rarely works long-term because you haven't dealt with the cause.
The real culprit is almost always excess moisture. In most homes, this comes from a few common sources that are all too familiar across the country:
- Condensation: This is the big one. Everyday life—showering, cooking, drying clothes on the radiator, even breathing—pumps moisture into the air. When that warm, damp air hits a cold window or an outside wall, it turns back into water droplets, giving mould the drink it needs to grow.
- Poor Ventilation: So many UK properties, particularly older ones, just don't have great airflow. Without a way for damp air to escape, it gets trapped inside, and humidity levels stay stubbornly high.
- Hidden Leaks: A slow drip from a pipe tucked away behind a wall, a cracked roof tile letting in rain, or blocked guttering can all create damp spots you won't even see until mould starts to appear.
Common Types of Household Mould
You don't need to become a fungus expert, but knowing what you're looking at can be helpful. You’re most likely to come across a few usual suspects.
Look out for Cladosporium, which often shows up as peppery black or dark green spots on painted surfaces or behind the loo. You might also spot Penicillium, which has a tell-tale bluish or greenish fuzz and loves water-damaged materials.
Then there’s mildew, which is really just mould in its early stages. It looks like a powdery, greyish-white patch. Of course, the one everyone’s heard of is Stachybotrys chartarum, or "toxic black mould." It has a slimy look and only grows in places that are seriously damp.
It's a common mistake to think only "black mould" is harmful. The truth is, any mould can cause health issues, especially for vulnerable people. The priority should always be safe removal, no matter what colour it is.
The Real Health Risks Involved
Mould isn't just an ugly stain on your wall; it can genuinely affect your health. It releases tiny spores into the air that are easily breathed in, and for many people, this can trigger a whole host of problems:
- Allergic reactions like sneezing, a runny nose, and skin rashes.
- Respiratory trouble, from coughing and wheezing to feeling short of breath.
- Worsening of existing conditions like asthma.
Children, older adults, and anyone with a compromised immune system or breathing problems are at the highest risk. That persistent musty smell is often the first clue that the air quality in your home isn't what it should be.
A Growing National Issue
Damp and mould aren't just one-off household problems; they're a massive national concern. In fact, data shows the challenge is getting worse in many parts of the UK.
Freedom of Information data from local councils recently revealed 25,134 mould and damp complaints in a single year, a staggering 35.06% increase on the year before. The problem is particularly bad in the North West and London, where the capital saw complaints jump by almost 97% in one year. You can read more about these regional damp and mould statistics here.
This data really drives home why fixing the root cause is so critical. By improving poor airflow, perhaps by fitting an adjustable round air vent for better ventilation, you start creating an environment where mould just can’t get a foothold. That’s the real secret to keeping your home free from it for good.
Your Essential Toolkit for Safe Mould Removal
Before you even think about tackling that patch of mould, it's crucial to get your gear in order. Trust me, trying to wing it without the right tools isn't just a recipe for failure—it’s a health risk. You can end up scattering spores all over your house and breathing in some pretty nasty stuff.
Think of this as your pre-battle prep. Getting it right from the start makes the whole job safer and far more effective.
First Things First: Protect Yourself
The most important part of your toolkit has nothing to do with cleaning and everything to do with staying safe. This is your Personal Protective Equipment (PPE), and it's absolutely non-negotiable. The moment you disturb a patch of mould, it releases thousands of microscopic spores into the air. You do not want those in your lungs or on your skin.
Here are the essentials to shield yourself:
- FFP3 Face Mask: A standard paper dust mask just won't cut it here. You need an FFP3-rated respirator mask. This is the UK standard designed to filter out the fine, toxic particles that mould spores are made of.
- Safety Goggles: Spores and cleaning solutions can splash, causing serious eye irritation. Get a pair of goggles that create a complete seal around your eyes.
- Heavy-Duty Rubber Gloves: Forget flimsy disposable gloves; they tear far too easily. You want thick, reusable rubber gloves that go part-way up your forearm, protecting you from both the mould and any chemicals. For smaller jobs, a good set of medical-grade disposable gloves can suffice, but always double-check them for any rips or tears.
Gathering Your Cleaning Arsenal
Once you’re kitted out, you need the right supplies to actually fight the mould. What you use will depend on the surface and how bad the problem is, but the tools you apply it with are just as important.
You’ve got two main options: commercial products or a DIY solution. Commercial fungicidal washes are specifically designed to kill mould and are approved to British standards, so they’re a reliable bet. They don’t just clean the stain you can see; they kill the fungus at its roots, which helps stop it from coming straight back.
A surprisingly effective and non-toxic alternative, especially for smaller outbreaks on non-porous surfaces, is a simple solution of white vinegar. Its natural acidity is great at breaking down and killing many common types of household mould.
A Critical Safety Warning: Never, ever mix cleaning products, especially bleach with ammonia or any other acidic cleaner. Doing so creates toxic chlorine gas, which is incredibly dangerous to inhale. Pick one cleaning solution and stick with it. And always keep the room well-ventilated.
The Right Tools for the Job
The right physical tools will make the clean-up far less of a chore. You need a way to apply your solution, scrub the mould away, and then properly clean the area afterwards.
Here’s a quick checklist of what you'll need:
- Spray Bottles: Keep one for your cleaning solution and a separate one filled with plain water for rinsing the surface down when you're done.
- Stiff-Bristled Brushes: An old toothbrush works wonders for getting into tight spots like grout lines. For larger, flatter areas, a bigger scrubbing brush is your best friend.
- Microfibre Cloths: These are perfect for the final wipe-down as they’re brilliant at trapping lingering moisture and particles. Have a few clean ones ready to go.
- Heavy-Duty Bin Bags: As soon as you finish, you’ll want to immediately bag up any used cloths, brushes, or other contaminated items for disposal.
With your PPE on and your toolkit at the ready, you’re prepared to tackle the mould head-on, safely and effectively, without putting yourself or your home at further risk.
How to Clean Mould from Any Household Surface
Now that you're kitted out with the right safety gear, it’s time to get to grips with the mould itself. The secret to getting this right is knowing that not all surfaces are the same. How you treat mould on bathroom tiles is completely different to tackling a patch on a plasterboard wall, and using the wrong method can easily make things worse.
This section will walk you through how to remove mould effectively, surface by surface, with techniques that work for UK homes. We’ll start with the easier, hard-sealed materials before moving on to the tricky, absorbent ones where mould really likes to dig its heels in.
Tackling Non-Porous Surfaces Like Tiles and Plastics
Non-porous surfaces are your easiest win in the fight against mould. We’re talking about materials like glazed ceramic tiles, glass, metal, and hard plastics—basically, anything water can’t soak into. Because the mould is just sitting on the surface, you can usually shift it completely with a bit of effort.
A classic example is cleaning the black specks that plague the grout and silicone sealant in your shower. Here, a bit of elbow grease and the right cleaning solution can make all the difference.
-
For Grout and Tiles: Mix up your chosen cleaner—either a commercial fungicidal wash or a simple homemade spray of equal parts white vinegar and water. Spray the affected area generously and let it sit for at least 15-20 minutes. This gives it time to start breaking down the mould. Next, grab a stiff-bristled brush (an old toothbrush is perfect for grout lines) and give it a good scrub. Rinse everything down with water and dry the area completely with a microfibre cloth.
-
For Window Frames (uPVC): Condensation is a major culprit for mould on plastic window frames and sills. The process is much the same: spray, wait, and scrub. Just be careful not to use anything too abrasive that could scratch the plastic; a non-scratch scouring pad is a much better choice here.
This flowchart is a great reference for choosing the right personal protective equipment for any mould cleaning job.
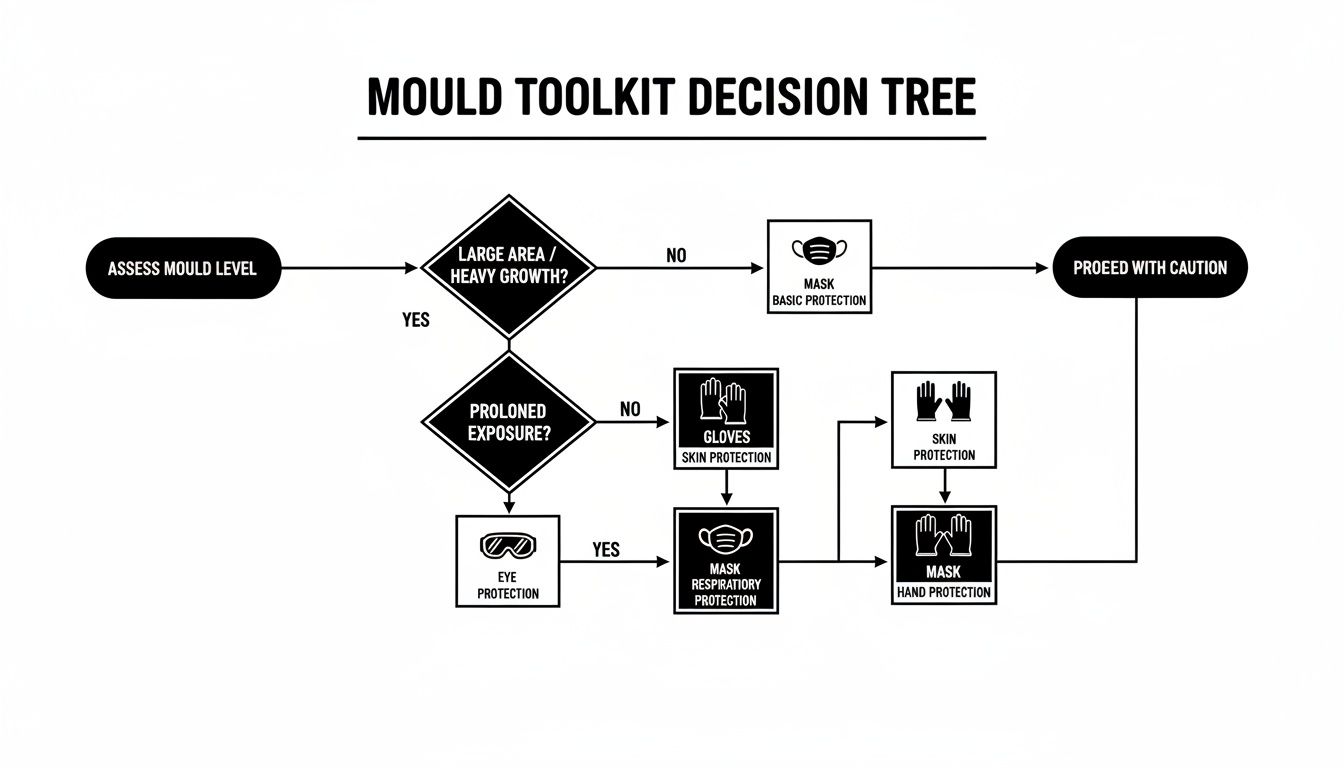
It helps you quickly work out what safety gear you need based on how much mould you're dealing with and your potential exposure.
DIY Mould Cleaner Recipes and Their Best Uses
For many small-scale mould problems, you don't need to reach for harsh chemicals straight away. Some of the most effective solutions can be made with items you probably already have in your cupboards. Here’s a quick-reference table to help you choose the right DIY cleaner for the job.
| DIY Cleaner | Mixing Ratio | Best For | Safety Precautions |
|---|---|---|---|
| White Vinegar | Undiluted or 1:1 with water | Non-porous surfaces (tiles, glass), hard plastics, some sealed woods. | Never mix with bleach (creates toxic gas). Wear gloves. The smell is strong but fades. |
| Tea Tree Oil | 1 teaspoon per 250ml water | Non-porous and some semi-porous surfaces. Great as a preventative spray. | Natural but potent. Keep away from pets, especially cats. Patch-test on surfaces first. |
| Baking Soda | Paste with water, or 1/4 tbsp in 250ml water | Mild abrasive for scrubbing grout, sinks. Also helps absorb odours. | Very safe, but can leave a slight residue if not rinsed properly. |
| Hydrogen Peroxide (3%) | Spray directly from the bottle | Effective on grout, tiles, and some painted surfaces. Can help lift mould stains. | Can bleach fabrics and some painted surfaces. Always patch-test first. Wear gloves. |
These simple recipes are surprisingly effective, but always remember to label your spray bottles clearly and follow the safety advice. When in doubt, a professionally formulated fungicidal wash is a reliable alternative.
Cleaning Porous Materials: Plasterboard, Wood, and Wallpaper
This is where the battle gets tougher. Porous materials like plasterboard, unsealed wood, wallpaper, and fabrics are like a sponge. When mould appears, its roots (mycelia) have already tunnelled deep inside, making a simple surface wipe pretty useless.
Just wiping the visible mould off a plasterboard wall is like trimming a weed—the roots are still there, and it’s guaranteed to grow back. The goal here is to kill the mould at its core without soaking the material, which could cause even more structural damage.
Method for Plasterboard and Painted Walls
This is a common headache in UK homes, especially on colder external walls or behind furniture where air can't circulate. Data from the English Housing Survey shows just how widespread the issue is, revealing that around 5% of homes in England have a damp problem, which is roughly 1 million dwellings.
For a mouldy patch on a painted wall, start by gently wiping the surface with a damp cloth and a mild detergent to get rid of the loose growth. Follow this with a proper fungicidal wash, applying it exactly as the manufacturer tells you. The key is to avoid aggressive scrubbing, which can damage the paint and send more spores into the air. Let the area dry out completely before you do anything else.
Dealing with Wood and Furniture
Unsealed wood is extremely absorbent. If you find mould on bare floorboards or the back of an old wardrobe, you need to be careful. A solution of vinegar and water can work well, but apply it sparingly with a cloth rather than soaking the wood. Scrub gently, then dry the area immediately with a clean cloth and get some air circulating to prevent the wood from warping.
Important Takeaway: If the wood feels soft, spongy, or is crumbling, the mould has likely caused irreversible decay. At this stage, the affected timber probably needs to be assessed by a professional and may need replacing.
What About Wallpaper and Fabrics?
Unfortunately, once mould has a proper hold on wallpaper and soft furnishings, they are often a lost cause. The paper and the paste behind it are an ideal food source, so the mould grows right through them. You can clean the surface, but you’ll never kill the roots embedded in the wall itself. In most cases, the only real solution is to carefully remove and throw away the affected wallpaper, treat the wall properly, and then redecorate.
For fabrics like curtains or upholstery, you might be able to treat small spots. Carpets, however, are a different story. While you might clean surface mould, any growth that has reached the backing and underlay is almost impossible for a DIYer to remove completely. If you're facing a tough carpet cleaning challenge, our guide on what is the best way to clean carpets offers more detailed advice.
Long-Term Strategies to Keep Mould from Coming Back

Getting rid of the mould you can see is a great start, but it's really only half the job. The real win is making your home an environment where mould simply can't thrive in the first place. This is less about constant scrubbing and more about being clever with your home's atmosphere.
Winning the war on mould means tackling the three things it absolutely needs to survive: moisture, stagnant air, and a comfortable temperature. If you can control these elements, you flip the script, turning a mould-friendly space into a place it can't get a foothold. This preventative mindset is genuinely your best defence.
Master Your Home's Humidity
Humidity is mould's best friend. If the air in your home is consistently damp, you're rolling out the welcome mat. For a UK home, you should aim to keep the indoor humidity level somewhere between 30% and 50%. Anything higher is an open invitation for trouble.
One of the most effective moves you can make is investing in a good dehumidifier. They are absolute game-changers for damp-prone spots like cellars, utility rooms, or bedrooms that suffer from window condensation.
To get the most out of your dehumidifier:
- Position it properly: Don't just shove it in a corner. Pop it somewhere central in the room so air can circulate all around it.
- Empty it often: Most models shut off when the water tank is full. Get into the habit of emptying it every day to make sure it's always ready to work.
- Use the hygrometer: Many modern units have a built-in hygrometer that measures humidity. Set it to maintain that sweet spot between 40-50%.
You'd be surprised how much of a difference small daily habits can make. Simple actions like popping lids on pans when you’re cooking, not drying laundry on radiators, and giving the shower screen a quick wipe-down all stop extra moisture from escaping into the air.
Radically Improve Your Ventilation
Mould flourishes in still, stagnant air. Boosting ventilation is all about creating a flow of fresh, dry air that carries away the damp, heavy air mould loves. You don't necessarily need an expensive overhaul; it's often just a case of using what you've got more effectively.
Start with the absolute basics. Make a habit of opening your windows for just 15 minutes each morning. This quick "purge" can make a massive difference to the moisture that builds up overnight.
In rooms that generate a lot of steam, like the kitchen and bathroom, your extractor fan is your greatest ally. Switch it on every time you cook or shower, and crucially, let it run for another 15-20 minutes afterwards to clear out all that lingering moisture. A fan clogged with dust and grease is next to useless, so give it a regular clean.
A couple of other small upgrades can also help:
- Trickle Vents: Those little slidable vents at the top of most modern window frames are brilliant for providing constant background ventilation. If your windows don't have them, it’s often possible to have them retrofitted.
- Air Bricks: Take a quick look outside and make sure any air bricks on your external walls aren't blocked by overgrown plants, soil, or other debris. They’re vital for letting air circulate under your floors.
Control Temperature and Cold Spots
You'll often find mould growing on cold surfaces where condensation gathers most easily. That’s why it’s so common on external walls, in the corners of rooms, or tucked away behind a bulky wardrobe. Managing your home's temperature to eliminate these "cold spots" is a critical part of your strategy.
Instead of letting your home get freezing cold and then blasting the heating, try to maintain a consistent, low-level warmth during the colder months. A steady temperature keeps the walls and other surfaces warmer, making it much harder for condensation to settle. An ambient temperature of 18-21°C in living areas is ideal.
Think about where your furniture sits, too. Just pulling wardrobes, sofas, and chests of drawers a few inches away from external walls can work wonders. It allows air to get behind them, stopping those cold, damp pockets from forming where mould can quietly take hold.
Clearly, figuring out how to get rid of mould is a major concern for UK households. A look at Google search data shows that some smaller cities have a huge proportion of residents searching for solutions. In Croydon, for example, mould-related searches reach 13,110 per month, which is 7.56% of the local population. It’s worth exploring how different UK cities are tackling the problem.
Don't forget to check on your appliances. Anything that uses water can contribute to damp if it's not maintained. A dirty washing machine, for instance, can grow mould in the rubber seal and drum. Using a dedicated washing machine cleaner treatment regularly will prevent this build-up, keeping another potential moisture source in your home in check.
When You Should Call a Professional Mould Specialist
While sorting out a small patch of mould yourself can be very satisfying, it’s vital to know your limits. There’s a big difference between a bit of mildew on the bathroom grout and a serious infestation. Trying to tackle a large or deep-rooted mould problem without the right training can go wrong quickly, spreading spores all over your home and making the air quality much worse.
Knowing when to put down the spray bottle and call in an expert is the key to protecting your home and your family's health. Let's be honest, sometimes the best DIY is knowing when not to do it yourself.
The Problem Is Too Large to Handle
The simplest rule of thumb? It’s all about the size. If you're looking at a patch of mould that's bigger than one square metre—think roughly the size of a large bath towel—it’s time to call for professional backup.
A large infestation like that can release a massive cloud of spores the moment you touch it. The professionals come prepared for this. They have the proper containment gear, high-powered air scrubbers, and the right personal protective equipment (PPE) to handle the job safely, without contaminating the rest of your house.
A widespread mould issue almost always signals a bigger problem lurking beneath the surface. A professional won't just clean what you can see; they'll hunt down the root cause, whether it's a hidden pipe leak or a major condensation issue that needs resolving.
Key Red Flags to Watch Out For
Beyond just the size of the patch, there are a few other tell-tale signs that scream "call a specialist." If you spot any of these, don't hesitate.
-
The Mould Keeps Coming Back: Have you cleaned the same spot over and over, only for the mould to stubbornly return? That's a classic sign that the problem is deeper than the surface. It's likely living inside porous materials like plasterboard or wood, and your cleaning efforts are only trimming the leaves, not removing the root.
-
A Persistent Musty Smell with No Visible Source: If your home has that unmistakable damp, earthy smell but you can't see mould anywhere, it's probably hiding. It could be behind wallpaper, under the floorboards, or tucked away inside a wall cavity. Professionals use tools like moisture meters and thermal imaging cameras to play detective and find these hidden hotspots.
-
Mould Caused by Contaminated Water: If the mould appeared after a flood or a leak involving sewage or other contaminated water (what's known as 'black water'), do not attempt to clean it yourself. This is a serious health hazard and requires specialist decontamination procedures.
-
Someone in Your Household Has Health Issues: If anyone in your home suffers from asthma, severe allergies, or has a compromised immune system, it's simply not worth the risk. Always bring in a professional to avoid triggering a serious health crisis.
When you do decide to hire someone, look for a reputable, certified mould remediation service in the UK. It's the only way to get real peace of mind that the job has been done thoroughly and your home is safe and truly mould-free.
Common Questions About Getting Rid of Mould
Even with a solid plan, you're bound to have a few questions when you're staring down a patch of household mould. Let's tackle some of the most common ones I hear, so you can move forward with confidence.
Can I Just Paint Over Mould?
I get this question all the time, and I understand the temptation. It seems like a quick fix, right? But the short answer is a firm no: never just paint over mould.
Slapping a coat of paint on top only hides the problem for a short while. The fungus is still alive and well underneath that fresh layer, quietly feeding on the surface and degrading your plasterboard. Before you know it, it will push its way right through the new paint, often coming back with a vengeance.
The only proper way to handle this is to kill and remove the mould first. Use a good fungicidal wash, let the area dry out completely, and then you can think about repainting. For best results, I'd recommend using a special anti-mould paint to give yourself an extra layer of defence.
Is Black Mould Really That Dangerous?
The phrase "toxic black mould" gets thrown around a lot, and it's enough to make anyone nervous. Certain species, like Stachybotrys chartarum, can indeed produce mycotoxins, which can be a real health risk if inhaled over time.
This is especially true for vulnerable people – young children, the elderly, or anyone with respiratory issues like asthma or a compromised immune system. The thing is, you can't tell what species of mould you have just by looking at it. Lots of different types can appear black.
My professional advice? Treat all mould with caution, no matter what colour it is. The best approach is always to get rid of it safely and quickly. For a particularly stubborn patch, a professional-grade antibacterial cleaner can be effective.
How Do I Know if Mould Is from Condensation or a Leak?
Figuring out the source of the moisture is the single most important step in stopping mould from coming back. Each cause leaves its own distinct calling card.
Mould caused by condensation usually looks like this:
- It appears as small, speckled black dots, often spread out.
- You'll find it on cold spots like external walls, high up in room corners, or around window frames.
- It almost always gets worse during the winter months.
On the other hand, mould from a leak tends to be:
- More concentrated in a single patch, sometimes with "tide marks" showing the water's path.
- Joined by other tell-tale signs, like a brownish water stain, bubbling paint, or a section of the wall or ceiling that feels damp and spongy.
Once you’ve correctly identified the culprit, you can create a targeted plan to fix the root cause and say goodbye to mould for good.
At Deal For Any Occasion, we provide practical and affordable solutions for maintaining a healthy home. From powerful cleaners to DIY essentials, discover everything you need to tackle household challenges at https://dealforanyoccasion.com.
Article created using Outrank