


Replacement Toilet Seat Hinges: A Simple Guide to Choose, Measure, and Install
That dreaded wobble every time you sit down… it’s one of those little household annoyances that’s surprisingly easy to fix. More often than not, it's a sign that the hinges holding your seat to the pan have seen better days. The good news is you almost certainly don't need a whole new toilet seat, just a simple hardware swap with some replacement toilet seat hinges. It’s a quick job that’ll bring back that solid, stable feeling in minutes.
Why Your Toilet Seat Is Wobbly and How To Fix It
A shifting toilet seat is probably one of the most common bathroom snags, but it’s rarely a sign of anything serious. The real culprit is almost always the small set of fittings that secure the seat. Day-to-day use, regular cleaning, and the naturally humid bathroom environment all take their toll on these small but crucial components.
The constant movement and pressure can work the nuts loose from underneath, causing that familiar side-to-side wiggle. You might find that grabbing a screwdriver or a small spanner tightens things up for a while, but if the hardware itself is worn, it’s just a temporary fix.
Signs Your Hinges Need Replacing
Before you start fiddling with tools, a quick visual check will tell you whether you’re dealing with a simple loose nut or a component that’s ready for retirement. Keep an eye out for these tell-tale signs:
- Visible Corrosion: Metal hinges, particularly cheaper chrome-plated ones, are prone to rust. Once corrosion sets in, the metal weakens, and you’ll never get a truly secure fit again.
- Cracked Plastic: A lot of standard hinges are plastic. Over time, it can go brittle and develop hairline cracks under the strain, making a stable connection impossible.
- Stripped Threads: Ever tried tightening a bolt and it just spins and spins? That’s a classic sign of stripped threads on either the bolt or the nut. At that point, there's no grip left, and replacement is the only option.
- Worn Gaskets: The small rubber washers that cushion the fittings against the ceramic can dry out, compress, or perish completely. Without them, there isn't enough friction to hold the fittings tight. Sometimes, just replacing these is enough, and having a good O-rings and seals kit on hand is brilliant for all sorts of little plumbing jobs.
A Common and Affordable DIY Fix
Sorting out a wobbly loo seat is a quintessential DIY task. Here in the UK, the bathroom hardware market thrives on small, affordable replacement parts rather than people buying entire new bathroom suites. Most spending in this area is on small-ticket items just like replacement toilet seat hinges. This trend has made competitively priced, easy-to-find parts a go-to for homeowners who just want a quick and effective solution. You can find more data on the UK’s focus on DIY replacement parts over at Statista.
Key Takeaway: A wobbly toilet seat is almost always a hinge problem, not a seat problem. Spotting rust, cracks, or stripped threads is your cue that a new set of replacement hinges is the most reliable long-term solution.
Choosing The Right Hinges For Your Toilet

At first glance, picking out new replacement toilet seat hinges might seem a bit over the top. But trust me, getting this right from the start saves a world of hassle. The right choice means a solid, long-lasting repair, so you won't find yourself repeating the job just a few months down the line.
The first thing you absolutely must do is figure out how your current toilet seat is fixed to the pan. This single detail dictates everything about the installation and the type of kit you'll need.
H3: Top Fixing vs. Bottom Fixing Hinges
When it comes to toilet hinges, they almost always fall into one of two camps, defined by how they attach to the porcelain.
- Bottom-Fixing Hinges: This is the classic, old-school method. You'll have a long bolt that pokes through the hole in the toilet pan, which is then secured from underneath with a wingnut or a similar fastener. If you can get your hand under the back of the pan to tighten a nut, this is what you’ve got.
- Top-Fixing Hinges: These are the standard for most modern, back-to-wall or fully-shrouded toilets where there's zero access underneath. They work a bit like a wall plug, using an expanding bolt mechanism that you tighten from above to create a secure grip inside the hole.
The quick check is simple: if you can easily see and feel a nut on the underside of your toilet pan where the seat attaches, you need bottom-fixing hinges. If the sides of your toilet are completely boxed in, it's a safe bet you'll need a top-fixing kit.
H3: Exploring Hinge Materials
The material your hinges are made from is a big deal, especially in a damp, humid bathroom environment. It directly affects how long they'll last before rust or wear sets in.
Picking the right material is a balancing act between budget, looks, and how much use the loo gets. Here’s a quick rundown of what you’ll typically find.
Comparing Common Toilet Seat Hinge Materials
| Material | Pros | Cons | Best For |
|---|---|---|---|
| Stainless Steel | Extremely durable, resists corrosion well, and has a premium look. | More expensive; low-grade steel can still tarnish or show rust spots. | Busy family bathrooms where you want a fit-and-forget, long-term solution. |
| Zinc Alloy | Affordable and surprisingly strong, usually chrome-plated for a shiny finish. | The chrome plating can eventually flake or corrode, exposing the alloy to rust. | Most household bathrooms with moderate use, offering a good balance of cost and aesthetics. |
| Plastic | The cheapest option, completely rust-proof, and comes in different colours. | Can go brittle and crack over time, particularly under heavy strain. | Guest loos, or when you need to match a specific coloured toilet suite. |
While stainless steel is the undisputed champion for longevity, a good quality zinc alloy hinge often hits the sweet spot for the average UK home, delivering decent durability without breaking the bank. It's a practical choice that reflects a wider trend; according to industry analysis, standard manual toilet seats still make up around 71% of global volume. This shows there's a huge, ongoing demand for traditional, affordable replacement toilet seat hinges, as people look to economically extend the life of their existing bathroom suites. You can read more on the toilet seat hinge market trends to see the full picture.
A Quick Tip: When you're shopping, always feel the weight of the metal hinges. A solid, heavy feel is often a good sign of better quality construction compared to a flimsy, lightweight alternative. This same logic applies to all bathroom hardware, from cabinet handles to the chunky clamps used for glass shower door hinges.
H3: Upgrading With Modern Features
Since you're replacing the hinges anyway, now is the perfect time to consider a few modern conveniences that can make a huge difference.
- Soft-Close Hinges: These are brilliant. A clever hydraulic damper mechanism lowers the seat and lid slowly and silently. No more accidental slams in the middle of the night!
- Quick-Release Hinges: An absolute game-changer for cleaning. A simple button allows you to lift the entire seat straight off the pan, making it incredibly easy to clean those awkward spots properly.
Many modern replacement kits now bundle both soft-close and quick-release functions together. For a relatively small extra cost, you can get a serious upgrade in both convenience and hygiene. By correctly identifying your fixing type and choosing a durable material, you’re well on your way to a secure, stable, and much-improved toilet seat.
How To Measure For A Perfect Fit
Ordering the wrong size toilet seat hinges is a classic DIY mistake. It's frustrating, but thankfully, very easy to get right with just a few minutes of prep. Before you even think about clicking 'buy', grab a tape measure. Three quick measurements are all it takes to guarantee you get the right fit the first time and avoid the hassle of a return.
Getting this spot on isn't just about making it look neat. A perfect fit is crucial for stability. If the hinges are even slightly off, they'll put uneven stress on the fittings, and that annoying wobble you're trying to fix will be back before you know it.
Pinpointing The Three Key Measurements
For a guaranteed match, you need to jot down three specific dimensions from your toilet pan. It’s much easier to do this once you've taken the old seat and hinges off completely, so you have a clear, unobstructed view.
- Hole Centres: This is the big one. Measure the distance from the very centre of the left fixing hole to the centre of the right one. This measurement determines the spacing required for the new hinge posts.
- Hole Diameter: Next, measure the diameter of the fixing holes themselves. Most UK toilets have a standard size, usually around 14-15mm, but it's always worth checking. The fittings on your new hinges have to be able to pass through these holes cleanly.
- Pan Length: Finally, measure from the centre-line of the two fixing holes straight forward to the very front tip of the toilet bowl. This measurement ensures your seat will have the correct overhang once it's all fitted.
A soft, flexible measuring tape works much better for this than a stiff metal one, especially when you're dealing with the curved ceramic. If you're building up your toolkit, a good soft tailor tape measure is one of those surprisingly useful bits of kit to have on hand.
What To Do With Your Measurements
With these three numbers in hand, you can now shop with confidence. As you browse for replacement toilet seat hinges, you'll see these exact dimensions listed in the product specifications.
Look carefully at the product description for the adjustable range of the hinges. Many modern replacement kits are designed with a bit of leeway, fitting a range of hole centres—for example, 135mm to 175mm. As long as your measurement falls within that range, you’ve found a winner. This built-in adjustability is a lifesaver and makes finding a compatible set for most standard UK toilets much simpler.
Installing Your New Toilet Seat Hinges
Right, with your new replacement toilet seat hinges in hand, it’s time to get them fitted. This is the moment where all that measuring and prep work pays off. The best part? You won't need a massive toolbox for this job. A few common household tools will do the trick.
Before diving in, it’s always a good idea to lay everything out. You’ll definitely need a decent screwdriver—a multi-bit one is fantastic for this—and maybe a pair of pliers for any stubborn old nuts. Keep a cloth and some bathroom cleaner nearby too; you'll thank yourself later.
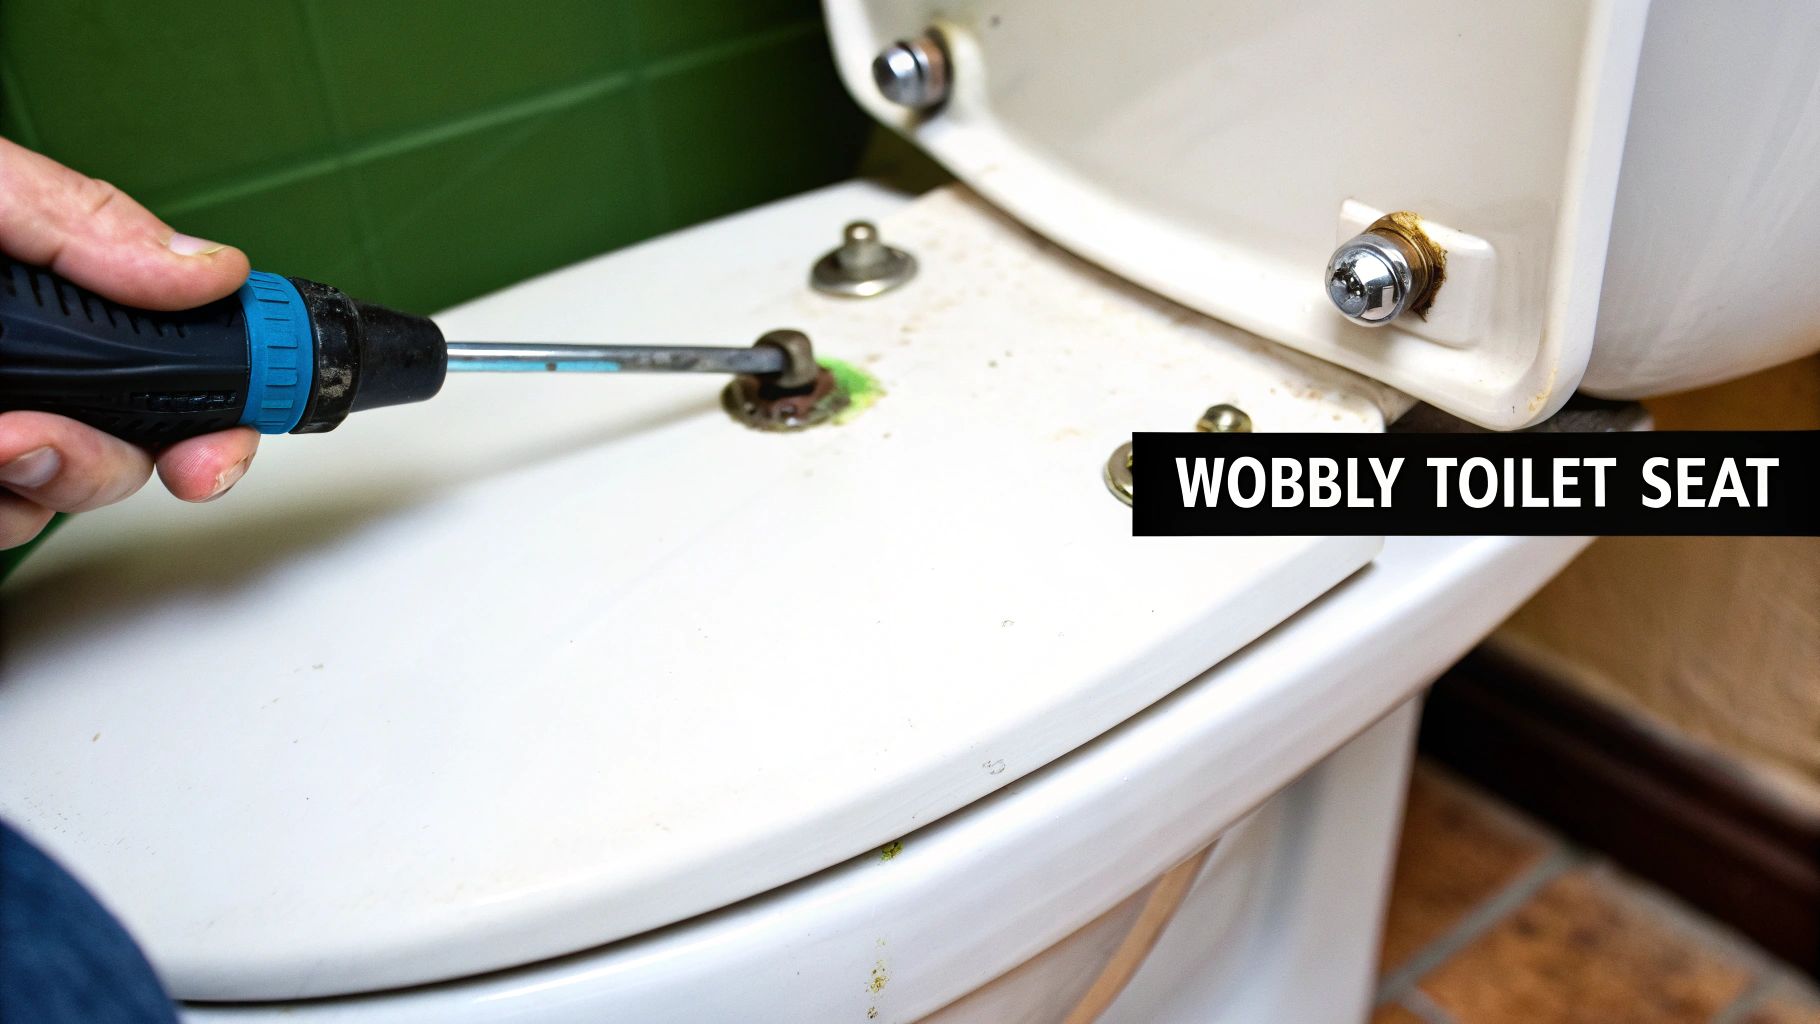
Removing The Old Fittings
Getting the old, tired hinges off is often the most challenging part of the whole process. If they've been on there for a good few years, corrosion might have them well and truly stuck. If you find the nuts won't budge by hand, use your pliers to get a solid grip on the nut underneath while you turn the bolt from above with your screwdriver.
Sometimes, you’ll come up against a bolt that seems completely fused with rust.
A Pro Tip From Experience: If a metal bolt is seized solid, don't force it. A few drops of a good penetrating oil (like WD-40) can be a lifesaver. Let it soak for ten minutes or so; it works its way into the threads and helps break down the corrosion, making the nut much easier to shift.
Once the old fixings are finally off, lift the seat away. This is the perfect chance to give the area around the holes a proper clean and get rid of any grime that’s built up in those hard-to-reach places. A clean, smooth surface helps the new hardware sit flush against the ceramic, giving you a much more secure and stable fit.
Fitting Your New Replacement Hinges
How you proceed from here depends entirely on whether you have top-fixing or bottom-fixing hinges. It’s worth taking a moment to look at the instructions that came with your kit and assemble the new hinge components before you start. Let's walk through both scenarios.
For Bottom-Fixing Hinges:
- From above, push the new threaded bolts through the holes in the toilet pan.
- Working from underneath, slide on any rubber or plastic washers that came with the kit. These are crucial as they protect the ceramic from cracking.
- Now, thread the nuts onto the bolts and just tighten them by hand until they feel snug. Don't go for the final tighten just yet.
For Top-Fixing Hinges:
- First, assemble the expanding bolt mechanism according to the manufacturer’s diagram.
- Drop the entire assembled fitting into the hole from the top.
- Use your screwdriver to tighten the bolt. As you turn it, a mechanism inside the hole will expand and grip the pan firmly. Again, only tighten it enough to hold it in place for now. You'll find that a decent set of magnetic screwdriver bits can be a real help here, preventing you from fumbling with dropped screws.
With the fittings loosely in place, you can now attach the seat. Position it carefully so it sits centrally on the bowl, with an even overhang at the front. This is your window of opportunity to nudge it into the perfect position.
This diagram shows the key measurements you should have already taken to get to this point.
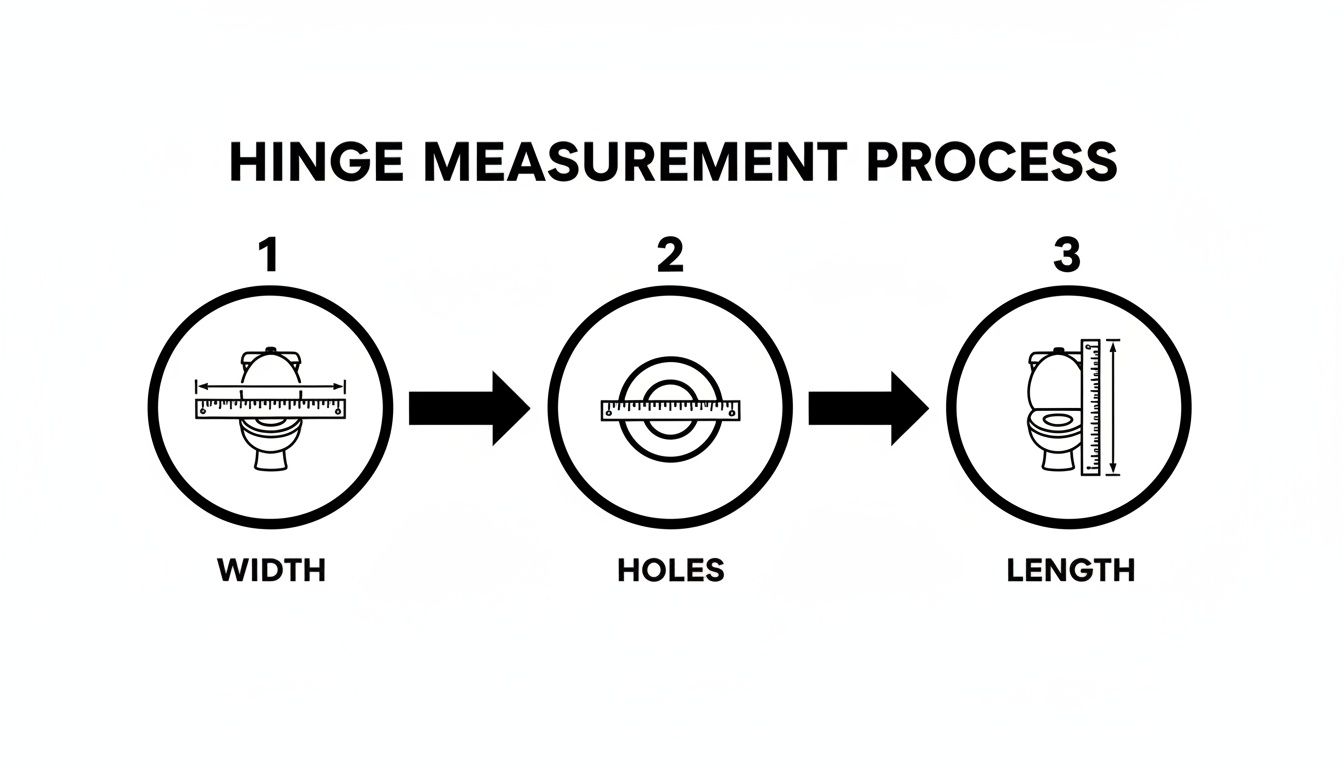
Getting these three measurements right—the width between fixing posts, the hole spacing, and the overall length—is what ensures your new hinges align perfectly without any hassle.
The Final Tightening
Once you're completely happy with the alignment, it's time to lock it all down.
For bottom-fixing hinges, get your pliers back on the nut underneath to hold it still while you give the screw a final turn from above. With top-fixing models, it's even simpler: just keep tightening the screw until the hinge base is completely solid and doesn't wiggle.
The goal here is firm, but not overtightened. It’s tempting to really crank down on the fittings, but you could easily crack the ceramic of your toilet pan. That’s a much bigger and more expensive problem to solve!
Give the seat a gentle shake from side to side. It should feel completely solid. And that's it—job done.
Troubleshooting Common Installation Issues
Even a seemingly simple job like fitting new toilet seat hinges can hit a snag. Let's be honest, it happens to the best of us. But don't worry, most of the common problems are quick to sort out once you know what to look for.
The classic issue? You've fitted the new hinges, tightened everything up, and the seat still wobbles. It’s incredibly frustrating. This usually means the fittings aren’t sitting completely flush against the toilet pan, leaving just enough of a gap to allow for that annoying movement.
Another frequent headache is misalignment, where the seat ends up sitting slightly skewed on the bowl. More often than not, this just comes down to needing one last adjustment before you give those bolts their final turn.
Solving Hinge Installation Problems
It’s easy to get disheartened when things don't go perfectly the first time, but nearly every installation hiccup has a straightforward solution. A little patience and a methodical approach will get you sorted without any drama.
I’ve put together a quick guide to help you identify and fix the most common issues people run into. Think of it as a first-aid kit for your toilet seat fitting job.
Common Hinge Installation Problems and Fixes
| Problem | Likely Cause | Quick Solution |
|---|---|---|
| The Seat Still Wiggles | The nuts aren't fully tightened, or the rubber washers are missing or have seen better days. | Go back and re-check that every nut is properly tightened. For top-fixing hinges, make sure the expansion bolts have properly gripped inside the hole. If everything's tight, the washer might be the culprit—try a fresh one. |
| Hinges Won't Line Up | The hinge posts are set at the wrong distance for the holes on your toilet pan. | Just loosen the fittings enough to allow for movement. Centre the seat on the bowl, then slide the hinge plates until the posts line up perfectly with the holes in the seat itself. |
| New Seat Sits Crooked | The seat wasn't held in the centre as you did the final tightening. | This is an easy fix. Slacken the main fixing nuts, give the seat a gentle nudge until it’s perfectly centred, and then carefully re-tighten everything while keeping it in place. |
| Cracked Ceramic After Fitting | The bolts were overtightened, putting far too much stress on the porcelain. | This is the one you really want to avoid. Always tighten until the fittings feel snug and firm—never use brute force. If you spot a tiny hairline crack, you might be able to seal it with a flexible filler for decor repair, but prevention is always the best cure. |
Once you’ve got everything sorted, you can be confident your new hinges will provide a stable and reliable fit for years to come.
Here's a little pro tip I've learned over the years: check the fittings again a day or two after installation. Normal use can cause things to settle slightly, and one final tighten will make sure that seat stays absolutely rock-solid.
Your Hinge Questions Answered
To wrap things up, let's tackle some of the most common questions we hear from UK homeowners about toilet seat hinges. Think of this as a quick-fire round to clear up any lingering doubts and help you finish your project with confidence.
Are Toilet Seat Hinges a Standard Size in the UK?
It’s a great question, but unfortunately, the answer is no. There really isn't a single "standard" size for toilet seat hinges across the UK.
While you'll find that many modern toilets have fixing holes spaced somewhere between 135mm and 175mm apart, this is more of a common range than a strict rule. You’ll often find that older bathroom suites, or even some of today's designer models, have completely different measurements. That’s why it's absolutely vital to measure the distance between your toilet pan's fixing holes before you even think about buying replacements.
Can I Upgrade My Standard Hinges to Soft-Close Ones?
Yes, absolutely! In most situations, this is a brilliant and surprisingly easy upgrade.
As long as you can find a soft-close hinge kit that matches your toilet pan's measurements and is compatible with your current seat, making the switch is usually straightforward. It’s become a really popular way to bring a bit of modern luxury into the bathroom without the cost and hassle of replacing the entire toilet.
What's the Difference Between Top-Fixing and Bottom-Fixing Hinges?
The key difference is all about how they physically attach to the toilet pan, which completely changes how you install them.
- Bottom-Fixing Hinges are the traditional style. They use a long bolt that passes right through the fixing holes in the pan and is secured from underneath with a nut. For these, you must be able to get your hands (and a spanner!) underneath the back of the toilet.
- Top-Fixing Hinges are the modern solution for toilets where you can't get access underneath—think of sleek, back-to-wall or fully enclosed designs. Everything is done from above, making installation much simpler for these types of pans.
This distinction has become more important as UK shopping habits have shifted online, where retailers often bundle compatible parts. With fierce competition in the home improvement space, offering the right kind of specialised fittings has become a key way for online stores to stand out. You can dive deeper into these market dynamics in the UK toilet seat sector if you're interested.
The Bottom Line: Bottom-fixing needs access from underneath the pan. Top-fixing is installed entirely from above, which is essential for most modern, enclosed toilets. Double-check which type you need before you buy to save yourself a major headache.
For a wide selection of reliable and affordable replacement toilet seat hinges and other essential DIY hardware, explore the collections at Deal For Any Occasion. Find the perfect fit for your home and get your project sorted today at https://dealforanyoccasion.com.
Article created using Outrank